Showing posts with label Tips to Try. Show all posts

Tuesday, May 17, 2011

Tips to Try--Easy Reverse Applique

I like the embedded quality of reverse applique found in molas, but have no desire to finish off all those little edges, so I've been playing around with some raw edge methods.

I did this a while back following Beryl Taylor's instructions in Cloth, Paper, Scissors. You can read more about it here.

I like the results, but there were several things I didn't like about the method. 1. It wastes a lot of fabric. One tiny crescent that shows on the front requires a large square of fabric that gets cut away. 2. It produces a bulky final piece that is difficult to hand stitch on.

So I started looking for a way to get the same effect minus the bulk and waste and came up with this easy method.

1. Place fabric pieces on top of very lightweight iron-on interfacing and fuse them together with the right side of the fabric up. Try to butt the fabrics together as much as possible, avoid overlapping them, but a little overlap won't hurt.

2. Place your cover fabric (in this case the purple that shows in the final piece but doesn't show here) on top of the colored squares and flip over. (Pin the cover fabric on if you need to.)

3. With the interfacing side up, stitch your design using a straight machine stitch. You can easily see where the fabric changes, so can design accordingly.

4. Flip right side up and cut away the cover fabric between the stitching lines, making sure you don't cut through the background fabric. The piece is very light weight so you can easily add handstitching.


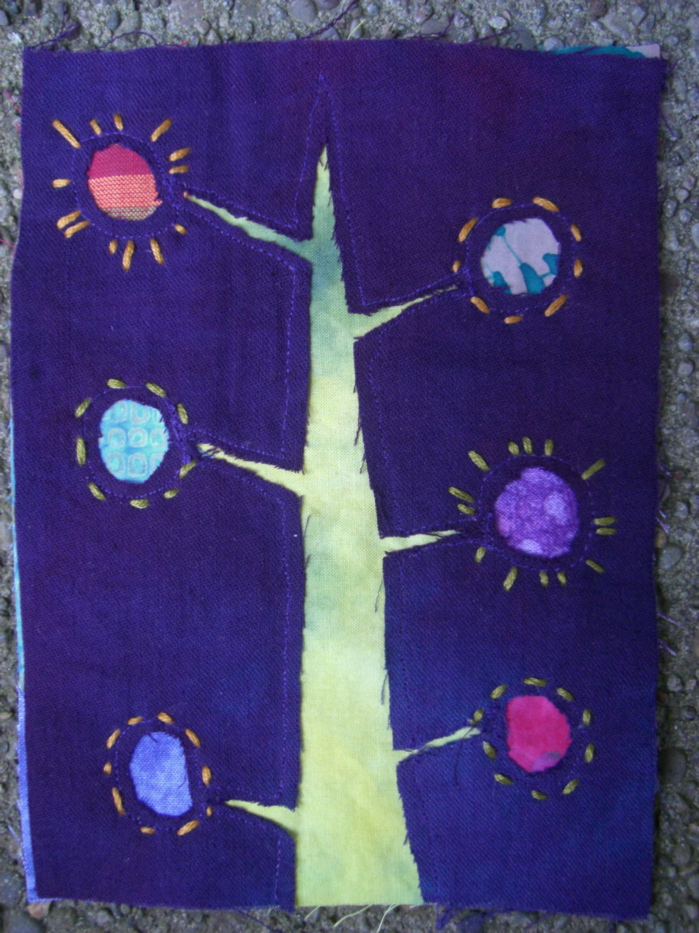
Seems like there are lots of possibilities with this method. I'd love to see what you do with it!

Tuesday, February 22, 2011

Easy Rivets- Tip to Try


Take your art to the next step…say no to glue…this is fun and easy to do.
 Choose the materials you wish to connect; this can be paper to paper, metal to metal, fabric to metal or any combination you can think up. As long as you can punch or drill a hole in it you can rivet it.  You will need: hammer, anvil, drill or hole punch, small nail (I use #17 wire brads) it must have a head on it and safety glasses.

Your first step is to put holes in your materials and line them up. Place the nail through the holes and place it nail head down on your anvil.

Put on your safety glasses! Clip the nail very close about 1/8” to the material.

Use your hammer to flair and smash the nail end. Start easy tap, tap, tapping and increase swings as the nail flairs. You will need to practice this, as with any technique practice will improve you project.

That’s it you now can make what is called a cold connection.
It really will take your work up a notch. People will say your work is riveting! If you like this post and “Tips to Try, please let me know with your comments, thanks for taking the time and reading our blog.

Wednesday, February 9, 2011

Tips to Try

I had a project that needed to look aged and didn’t want to take a lot time or materials to accomplish it. These methods can be used on almost anything from fabric to your favorite journal. I hope you find one you can apply to your art.
I cut the tags from an old book and stamped the words on it.
Next using wax from a red tea light I coated the paper. A bit of a mess.
I then burnt the edges to age it. They are now ready to punch a hole in.
The crowns are very inexpensive and were way to shinny. Easy fix was to use pliers to hold it over a flame. I like this look much better.
 The burlap was almost new I wanted it a little darker so  I soaked it in coffee and tea. The longer it sat in the coffee the darker it got.
I was impatient and pulled it to soon so I used some diluted paint as a light wash.

I would love to print on old paper but my printer just rips it up. So the next best thing to do is ruff it up with sand paper. I even sanded a hole to add authenticity. I also used Distress Ink and brushed it with a little water. Now I'm happy with it.
 I love building all the elements to a project but when you get to put it all together that's when the fun starts.
The label says "Our Lady of Abundant Inspiration" I hope this can inspire you to try to age a project of yours.

Monday, February 7, 2011

Tips to Try- a valentine paper cut


Learn to make a one of a kind Valentine paper-cut.
This project takes few supplies and can be completed in a very short time. You will need; a self healing mat, exacto knife,text weight paper, pencil, light to medium weight black paper and your back ground paper.


Finding and deciding on your image might be the hardest part of this project. Once I have an idea I do a rough sketch to see if it has balance and will translate well into the paper-cut. I then draw it again with all the details like where the breaks in the cuts will be. Paperclip or tape it to your black paper.
Now the fun begins, take your time and make your cuts with a new blade.
When you are finished cutting remove the top white paper to reveal your finished piece.
Mount your finished piece on contrasting paper. You can make it into a card or a wall hanging.

 I have had some paper cut posts on my personal blog if you would like to see them follow this link. #1link - #2 link - #3 link .

Have a Happy Valentines-