Showing posts with label fiber art. Show all posts

Sunday, February 10, 2013

Moon Garden


I've been working on a series of fiber pieces and finished piece #1.  It's titled "Moon Garden"and is 9"x34".


Besides a few handpainted bits, it's made entirely out of scraps I scrounged--old sari fabrics and scraps left behind at a quilting store.  Nothing makes me happier than making something for nothing!


I began this piece in a workshop with Sue Benner.  She is a fabulous teacher and artist, and I was inspired to try her technique of working with fusible web to create the spontaneous, painterly look I was after.  I ran into some challenges by trying to incorporate soft, frayed edges and handstitching along with the fusibles, but I like the effect, so will continue to experiment along those lines.


Tuesday, May 17, 2011

Tips to Try--Easy Reverse Applique

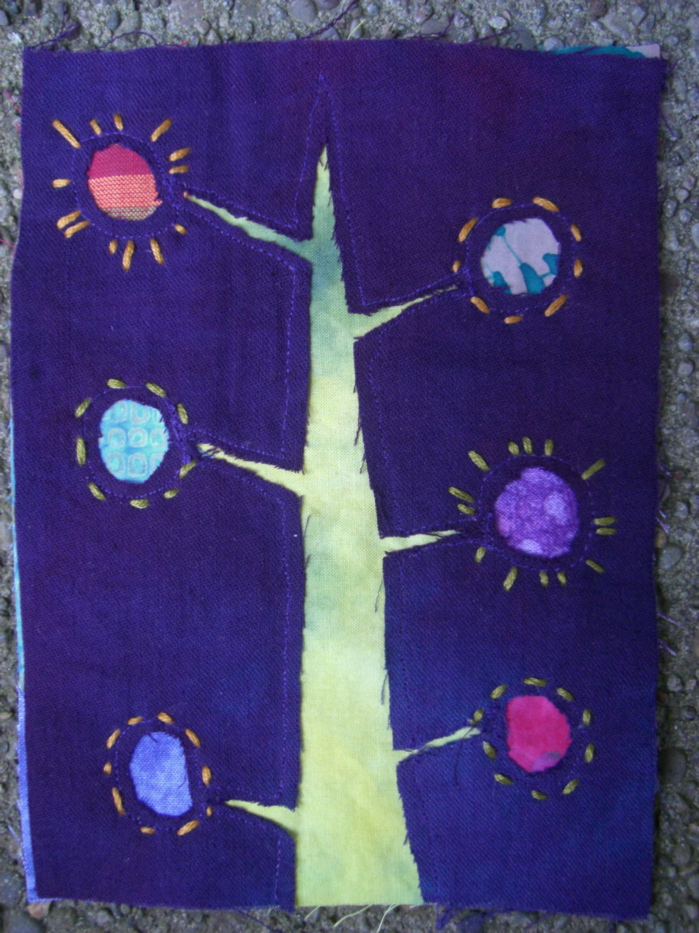
I like the embedded quality of reverse applique found in molas, but have no desire to finish off all those little edges, so I've been playing around with some raw edge methods.

I did this a while back following Beryl Taylor's instructions in Cloth, Paper, Scissors. You can read more about it here.

I like the results, but there were several things I didn't like about the method. 1. It wastes a lot of fabric. One tiny crescent that shows on the front requires a large square of fabric that gets cut away. 2. It produces a bulky final piece that is difficult to hand stitch on.

So I started looking for a way to get the same effect minus the bulk and waste and came up with this easy method.

1. Place fabric pieces on top of very lightweight iron-on interfacing and fuse them together with the right side of the fabric up. Try to butt the fabrics together as much as possible, avoid overlapping them, but a little overlap won't hurt.

2. Place your cover fabric (in this case the purple that shows in the final piece but doesn't show here) on top of the colored squares and flip over. (Pin the cover fabric on if you need to.)

3. With the interfacing side up, stitch your design using a straight machine stitch. You can easily see where the fabric changes, so can design accordingly.

4. Flip right side up and cut away the cover fabric between the stitching lines, making sure you don't cut through the background fabric. The piece is very light weight so you can easily add handstitching.


Seems like there are lots of possibilities with this method. I'd love to see what you do with it!

Tuesday, April 5, 2011

Fragile

I finished this new fiber piece called "Fragile." Many of the fabrics are reclaimed--some vintage linens, some almost rags, but I love the worn history each of them brings. They are held together only with lines of stitching, no backing, to show off their delicate nature.


I love the fringe on the bottom made of chains of funky crochet mixed with torn and knotted organza:


Friday, November 26, 2010

Owls


I have been happily stitching away on sets of owls for our show. Here is the bigger, 8", size.

And a whole parliament, which I recently learned is the word for a group of owls--how perfect is that?

I love working on this larger size because it allows more room for building up layers of textures and colors:

They look giant against the smaller ones, but it's mainly camera angle. The smaller ones are 4" and are meant to hang or stand.


Sunday, November 7, 2010

Delicate Souls

I have been busily finishing up pieces for our Dec. show. I decided to take some of my favorite faces from my 2 weeks of face experiments starting here, and turn them into finished pieces. I'm calling this my "Delicate Soul" series since they all feel very gentle to me. I've been framing them in fragile fabrics full of soft frays and giving them just a line of text as it comes to me while I'm working on them.


I'm thrilled with the hanging device I came up with. I stitch a clear straw on the back and thread a string through it for hanging. It keeps the piece feather weight yet gives it support at the top. You can barely see it here, which is why I'm so happy with it.


Monday, January 4, 2010

Create a Quilted Pet Portrait

I enjoyed making this cat portrait for a friend's birthday present. Check out how I made it Here on my blog.

Saturday, December 26, 2009

Recommend "Remains of the Day" online class

Darlene Veltman told me how much she liked this new online class with Mary Ann Moss called "Remains of the Day" a shabby scrap journal. I decided that I wanted to make one, too. This week, I made the journal cover using a template, fabric scraps and stitching.
What I like about Mary Ann's online classes- she shows lots of how-to videos, provides PDF file instructions, shares what other classmates have made- all with a great sense of humor and a lot of fun.
I used fabrics from France and Japan to make this journal cover. What is great about the process Mary Ann uses is her sense of play and pure experimentation. I highly recommend her online classes.

Tuesday, October 13, 2009

Felted Wool Tree Danglies & Garland by Lenall Siebenaler


I did not design this danglie, but saw one like it 3 years ago and loved it. I actually bought one for 24.00!!! I have loved it ever since though! What a nut! Mine will be $6-8.00.
I have to tell you that I have blisters on my fingers from using the pinking shears! Anyone know the secret?It was definitely a labor of love!
I made 2 colorways in the trees: Green and purples and a more traditional red, green, yellow and purple. Which do you like best?
I had so much extra cut up scraps I decided to recycle and make some garland. Very funky! (of course I could not just use the scraps I had to keep making them all night and made 4.)
Lenall

Thursday, July 30, 2009

Hearts in the Heat Wave

I've been taking advantage of the heat wave to sit under the air conditioner and stitch hearts. I'm really happy with how green these are--probably 95% is from recycled materials. The bits are mainly old clothes and linens that I hand dyed. Designer samples form the base, and even the batting came from Goodwill. The first 2 are larger 12" hearts, and the second 2 are 5".


Saturday, November 29, 2008

Framing Time

I'm in the final steps of getting things framed for our show this coming week.  It snuck up so quickly!  Here are some of my fabric creations for this year.   I'm framing most of them in small floating or matted frames and am really happy with the way they look.  Most of these pieces are experiments with the traditional crazy quilt form.


A few of my more textural pieces like this are going in deeper, shadow box frames:


Saturday, October 4, 2008

What If? Crazy Quilt Challenge

I am having a great time experimenting with the Crazy Quilt block.  I have been participating in a "What If?" challenge hosted by the amazing fiber artist Jude Hill at Spirit Cloth.   The idea is to start with the concept of a traditional crazy quilt block but ask, "What if I changed it in some way?"  You can read more about these on my blog if you'd like more details.

In this piece, I started with my (mostly) hand painted graffiti fabrics as a traditional crazy pieced background.  I then asked, "What if my embellishments were all done with sheer fabrics?"


In this next piece I started with the same graffiti background, but this time I asked, "What If I make separate tufts of layered fabrics and attach them with handstitching for the embellishments?"


I'm now working on a series of these graffiti based pieces.  Another direction I moved in was to ask, "What if I layer each piece, tack the layers together, and run it through the wash to create lots of texture?"  I then used embroidery to anchor some pieces down and emphasize the curls and wrinkles of others.
I am finding that this very focused challenge of only changing an element or two at a time while working in a traditional form has been a great way to expand my creativity.  I'm excited about trying many more!